What is in my Triathlon Photography Kit - Part 1 Camera Bodies

All the gear and some idea

Obsessing over camera gear is an expensive pitfall that many newer photographers can fall into. The most important part of your kit is the photographer behind the camera, but there is also a reality to sports photography….it is demanding on gear, and you need to make sensible decisions around gear acquisition.

I touched on some of my triathlon photography kit about a year ago in my post about How to Photograph Triathlons. Since then, I’ve grown as a photographer, and my kit has evolved a bit along with me. The additions to bring it up to my current kit are incremental, and are mainly centred around convenience and slight improvements in image quality.

Over the following series of blog posts I’ll talk through my current kit, which is by no means a budget set-up and has been funded through my work as a photographer. I’ll also be putting together my suggestions for a starter kit that can be put together with a budget of roughly $1500.

Part 1 - Camera bodies

Once you start getting serious about photography, and particularly once you start accepting paid jobs, you simply cannot rely on just one camera body. Having multiple bodies provides the convenience I need of being able to shoot with different focal length lenses without having to change them (more about lenses here), but above all else, having a second body will save your bacon if one body happens to fail. If you’re shooting an important event and your only body fails, resulting in no images for the client, then they won’t be having you back.

My current camera bodies

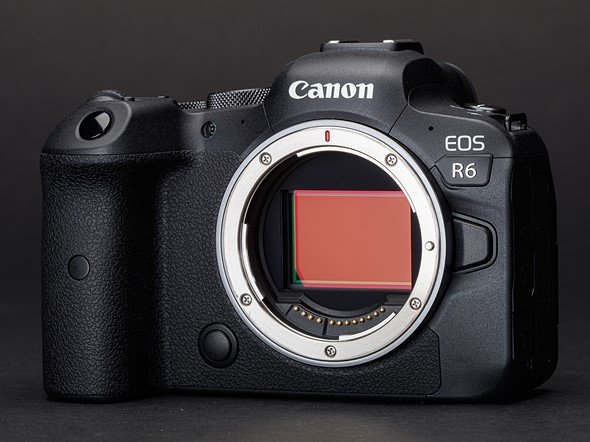
Canon EOS R6. Purchased earlier this year and was my first ever brand-new camera. It is an amazing camera, and the auto-focus system is out-of-this-world. I use all my “old” EF glass with the EF-RF adaptor, and the lenses perform flawlessly. The video capabilities are also very useful for some of my other non-sport projects that I’ve done. I’ve written more about the Canon EOS R6 for triathlon photography and general sports photography.

The Canon EOS R6 really is a game changer.

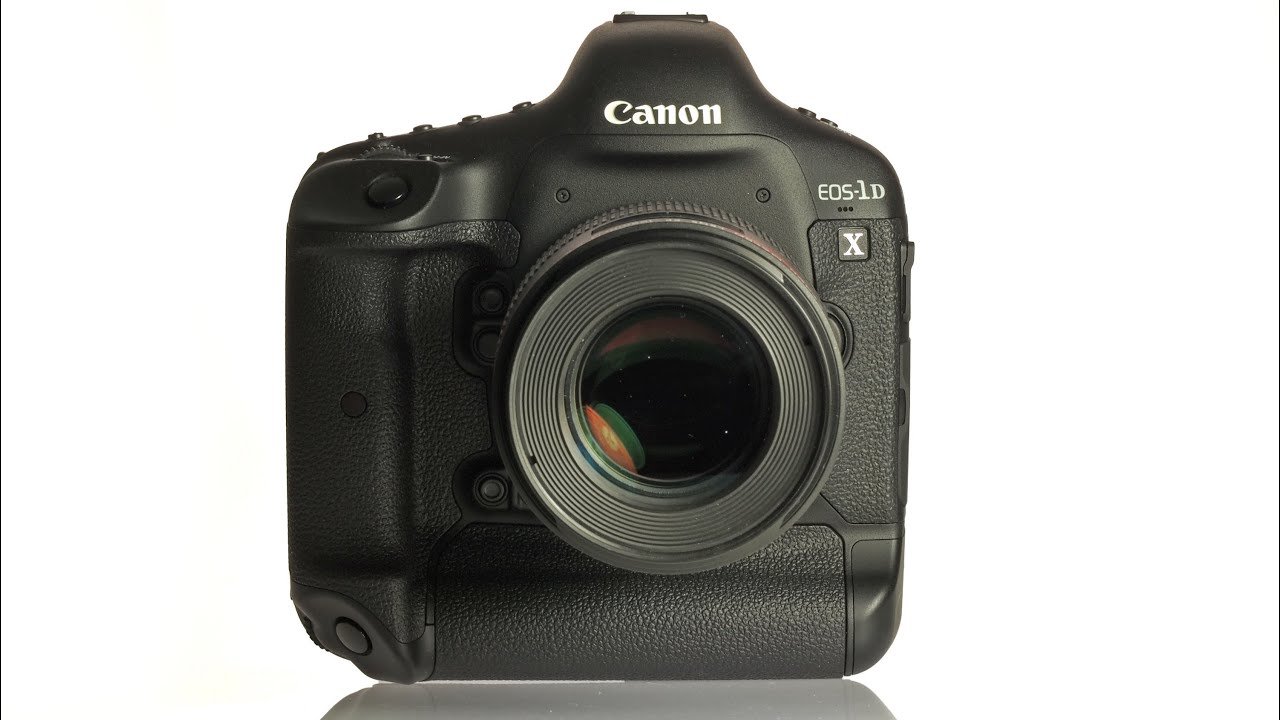
 Canon 1Dx. Yes, the original 1Dx from 2011 (?). I picked this up second-hand just a few months ago for about $1300 to replace my 5Dmk3 which had started having some issues with a spot on the sensor. The 1Dx is still an exceptional camera and the price was right. This one has about 180,000 shutter actuations, so still has over half of its expected life. It is also built like a tank (something which the R6 lacks), so is perfect at those inevitable rainy triathlons.

Built like a tank and heavy as all hell, you just know the Canon 1Dx is built for reliability.

 Canon 5Dmk3. My staple workhorse for the better part of 2 ½ years. I picked this up second-hand for just over $1000, and it was an amazing camera. I’ve put tens of thousands of photos on this camera, it is still performs perfectly in that regard. Unfortunately, I’ve noticed a dark spot appearing in the top-right corner of all the photos, which persists with different lenses and has remained after cleaning the sensor hasn’t fixed it, so it may be a patch of dead pixels on the sensor. Cloning it out is an easy fix in Lightroom, but with thousands of photos at an event it isn’t practical. It won’t be on my hip anymore, but I’m still keeping it for when I need a remote camera set up (more on that below).

The sensor spot (circled in red) that just wont disappear from my beloved 5Dmk3. It is even more obvious with the sky as a background!

Conclusion

So that is my current complement of camera bodies. I will generally have my R6 and my 1Dx mounted on a Blackrapid Dual strap with whatever lenses I need at the time. Occasionally one of them will be mounted on a monopod if I am going to be in a single spot for a long time shooting with one of my larger telephoto lenses.

Read on for Part 2 where I talk about my selection of lenses for triathlon photography, and the Part 3 where I talk through some additional accessories that will take your triathlon photography to the next level.

Editing Sports Photos

How to Edit Sports Photos

How should you post-process your sports images?

One of the things that novice photographers often agonise over, and often come unstuck on, is how to edit their sports photos. It is very easy to get carried away with the vast array of sliders in Lightroom (or your editing suite of choice) and I can guarantee that every established photographer has photos that they look back on and say “wow I really over-did the processing on that one”.

All that being said, where do you get started? Over the years I’ve developed an editing style that is to my taste, but is also quick. When I’ve shot 500-1000 images of competitors I don’t have time to sit there agonising over 30 different sliders in Lightroom. I try to get the photo as close to correct straight out of the camera, and then just do a few simple adjustments.

Simple steps to edit your sports photos

Step 1. Get it as close to correct straight out of camera

The less edits you have to make, the more efficient you will be. The below images is straight out of camera (SOOC). I’ve exposed for the competitors face, and it is pretty close to what I’d like in the final image. The highlights are on the high side, but they are within the recoverable range in the RAW file.

No editing, straight out of camera

No editing, straight out of camera

Step 2. Crop tight

In 95% of the sports photos you shoot, the person will be the main subject of the photo so you should crop tight and fill the frame with them. Ideally you will get this close to correct in camera to minimise the amount of cropping you need to do. It is important to note that as you crop, you’re removing pixels from the image, so quality will degrade. As a general rule, I won’t crop away more than 1/3 of the total image.

You should remember your rule of thirds when you are cropping as well, and use this to draw the viewers eye to the part of the subject that you want them to focus on.

The only exception to cropping tight is when you have an environmental component that you want to incorporate into the photo. You can see a few examples of these in my portfolio, where I’ve cropped wide to incorporate something like a cliff-face or an ocean view. Again, these are the exception rather than the rule with sports photos.

Crop tight

Crop tight

Step 3. Exposure

Very minimal correction needed here, but it will depend on how you’ve exposed in-camera. I’ll often set my camera exposure compensation to +0.5 stop (I didn’t in this instance because I was dealing with some back-lighting), because I know that it the sweet-spot for how the metering works on my camera, but this will be personal preference. In the case of this photo, I added 0.5 of a stop of exposure in processing to bring the face and skin up slightly. You can see some of the highlights along the competitors back are starting to get a bit “hot”, but I know from experience that they’re in the recoverable range in Lightroom.

Exposure correction. In this case, 0.5 of a stop.

Exposure correction. In this case, 0.5 of a stop.

Step 4. Contrast, highlights and shadows

This is probably the part of the editing workflow that will throw most novices. The temptation is to chuck in a bucketload of contrast because at first glance it makes the image “pop” a bit. However, dumping contrast into the image actually removes detail, and the key to a sharp, bright image is to actually remove a bit of contrast and then compensate for it with the dehaze slider.

In this step, I’ve taken -30 contrast, brought down the highlights by a fair bit to recover the detail along the competitors back, and I’ve raised the shadows by +24. The image might look a little bit flat at this stage….don’t despair, it will come back in the next step. The highlights along the back are still quite strong, but I can tell from the histogram that they aren’t completely blown out.

Contrast decreased to recover detail, highlights dropped and shadows raised.

Contrast decreased to recover detail, highlights dropped and shadows raised.

Step 5. Dehaze and clarity

This is where some of that “pop” will come back into the image by using dehaze to compensate for the removal of contrast. In this image I’ve used +25 dehaze. I’ve also added in just a bit of clarity (+14). You need to be really careful with the clarity slider….it is very easy to get carried away and it will end up making the image look completely fake.

Adding dehaze and a little bit of clarity. The image now pops quite nicely

Adding dehaze and a little bit of clarity. The image now pops quite nicely

Step 6. Saturation

I haven’t actually used this step on this image because I didn’t feel it needed it. However, if you feel that parts of your image need a bit more saturation, DO NOT USE THE SATURATION OR VIBRANCE SLIDERS. Yes, it is easy and will give you a quick hit of colour, but they are a global adjustment and they mess with skin tones. Your subject will begin to look like an Oompa-Loompah. Instead, you should be adjusting the individual saturation sliders in the HSL panel. If I wanted to add some saturation to this photo, I would probably just be increasing the yellows and pink (magenta) sliders to make the race suit pop a bit more.

Step 7. Sharpening

Sharpening is something that novice photographers will often forgo, because they’ve experienced the horrors of using too much sharpening and ruining images. The key is to be restrained with the sharpening, and use masking to ensure on the things you want sharpened get sharpened. At first glance there will be almost no visible change to the image, but trust me when I say it does improve the overall impact of the image. For this photo, I’ve used my standard amount of sharpening (+75) and I have masked so that the background isn’t being sharpened. In Lightroom the masking is super easy….just hold Option (or Alt on PC) as you move the masking slider. Everything that is white will be sharpened, whilst everything that is black will not be sharpened.

Final sharpened image

Final sharpened image

Finished photo

….and we are done. After the sharpening step the photo is ready to go. At a glance this might look like a lot of work for a single photo, but in reality it is less than 1 minute worth of editing. Now that being said, 1 minute of editing is impractical when I’m delivering 500 or 1000 images of competitors, so how do I manage that aspect of the workflow?

Workflow for large events

My workflow for mass-participation events is actually quite simple. I tend to shoot a bunch of photos from one location under the same conditions, so what I’ll usually do is process a single representative image, and then apply those edits (via the sync function) to the rest of the images from that set. I will then just quickly flick through them to make sure there aren’t any where something weird has happened (like a cloud passing overhead).

With 5-6 different locations/conditions per event, I can easily process 1000 final images in about 30 minutes. After that, they’re ready for export and upload.

Give it a go yourself

If you’d like to practice this type of editing yourself, you can grab the RAW file of the image used in this blog from here, drop it into Lightroom and have a play around. Just make sure you “reset” it if my edits are already showing for you.